Theorycraftpedia

NOTE: This is an unfinished/soon to be outdated work.

It’s been a draft for almost 9 months, and now that a new expac is coming it’s becoming clear it’s just not going to get finished. I simply don’t have time anymore. I never got around to doing trinket uptime, or the myth of the infinite RP cycle, or other things. I decided to release it in it’s current state, incomplete, because there are still some things in here that can help teach you how to “math things out” that are independent of class, expac, ect. How statistics works isn’t going to change, even if the class does. With that, here is what was supposed to be my legacy as a theorycrafter. May you learn lots, because that’s what I’ve always wanted from this theorycrafting as a whole: to make people learn.

The following was written and left uncomplete in July 2015:


I have some sad news. Due to a combination of burnout and class conflict next semester (surprised I made it this far without an evening class to be honest), I have put my raiding career on indefinite hiatus. Perhaps I’ll come back to the game after a while, but at least for next tier and the near future I am in retirement from raiding, and investing my try-hard-gamer time into Starcraft II (platinum league hyyyyyype). I’ll still be around, but I won’t be actively raiding however, and because of that I won’t be maintaining my guides or doing the guide rewrite I was intending to do. Regardless of the future, I do want to thank everyone in the community who either loved or hated (and consequently criticized and improved) my theorycrafting work over the years. As a token of appreciate I leave you with this: a compilation of EVERYTHING related to blood DK theorycrafting I can think to put in. Formulas, how to solve different problems, which angles to tackle new problems, the works. If I end up not coming back from this break, this is to be the legacy I leave. If even one person learns something new about blood dk and the math behind it, then I will consider this post a huge success.


Before I begin, I will make one disclaimer. I am a few classes away from a B.S. in Computer Science (and a B.M. in Music Performance, but there won’t be any 4 species counterpoint in this post I promise), so while i’m no stranger to math I’m by no means a mechanical engineer, and I don’t have a PhD in Physics or statistics. Even if something I have isn’t wrong, it may not be the cleanest solution. This stuff is simply the stuff i’ve learned and applied to theorycrafting, and isn’t THE way to do things because there isn’t a “THE way”. Never take anything anyone says for 100% fact until you look at the source yourself, as they may be wrong (as I have been MAAAAANY times). And if you do start doing the math for yourself, don’t let yourself forget that you too can be wrong. The moment you stop believing you can be wrong, is the moment you stop learning.

With that out of the way, here is a bunch of theorycrafting gobbledygook!


Let’s start with the basics.

The Basics

What is the goal of theorycrafting?

It’s important to know what you’re actually trying to do. “theorycrafting” covers a wide range of things, ranging from simply hitting a dummy for an hour diligently to get data, or doing high level mathematical analysis to get a theoretical picture of what’s going on. Essentially, theorycrafting is like science. You are presenting a possible solution, and backing it up with some form of evidence, be it logs, math, or simple logic. Just like in science, the important thing is rarely the actual math, but rather the angle you are tackling the problem from, which brings me to my first big basic principle.

it’s possible to be right and still be wrong.

You can have math that is 100% correct and proven completely analytically and by the book, and still be dead wrong. Why? Because the angle with which you were approaching the given problem was incorrect from the start. Let’s take a look at two possible approaches for analyzing Runic Empowerment vs Blood Tap, both using perfectly acceptable math but answering two completely different questions:

Approach 1:

Let’s find the value of Runic Empowerment and compare it to the value of Blood Tap! how do we find it? We look at the overall runes returned (a.k.a. throughput)!

Let’s compare their rune return per Death Coil value. With one death coil with Blood Tap chosen, you will get 2 charges. You need 5 charges for a rune, so each Death Coil is worth 2/5ths, or 40% of a rune. With Runic Empowerment, you will get a full rune (100%) back on every proc, with a 45% chance to proc per Death Coil. This means on average, you will get .45*1 = 45% of a rune per Death Coil with Runic Empowerment.

So to compare:

Blood Tap – 40% of a rune per Death Coil

Runic Empowerment – 45% of a rune per Death Coil

So approach 1 is claiming that Runic Empowerment is better than Blood Tap, and has math to support it. The math is not wrong, and those rune per death coil values are absolutely correct, so why does every guide (that has its shit together at least) claim Blood Tap is better? Let’s look at approach 2.


Approach 2:

Let’s compare Runic Empowerment and Blood Tap! We know, that Runic Empowerment provides slightly more rune throughput than Blood Tap, but I have a hunch that it’s not as reliable. So this time i’m going to look at them in terms of reliability.

In order to get benefit from Runic Empowerment, both FU pairs need to be recharging because it only procs on fully depleted runes. This means that until we get our second proc, we will be without a Death Strike. (We will get more into the math here later in the Statistics section, so don’t worry if you don’t follow all of this). Since back to back uses of Death Coil can be classified as Bernoulli trials, (independent and same probability each time), we know the number of successes until the 2nd Runic Empowerment proc follows a negative binomial distribution.

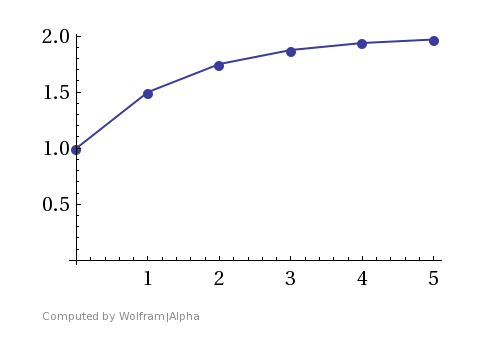
graph2


The graph above shows that getting the 2 procs we need should happen sooner rather than later, and the average is going to be 4.44 GCDs (I’ll show how this is calculated in the statistics section), meaning it will take an average of 4.44 seconds to get our FU pair back, assuming we Death Coil on every GCD.

Approach 2 conclusion:

even though Runic Empowerment provides more raw throughput, an average of 4.44 seconds where you can’t Death Strike even in emergencies is pretty terrible. This makes a FAR stronger case for Blood Tap > Runic Empowerment than approach 1 made for Runic Empowerment > Blood Tap, so this is the approach we’ll take, making our official verdict Blood Tap > Runic Empowerment.


In BOTH cases, the math was correct. No one forgot to carry the one, and no one added 2+2 to get 5. So why was the first approach so wrong? It came at the problem from the wrong angle. It was ONLY looking for raw throughput, and didn’t put it into context of the bigger picture.

Math is a powerful tool, but not the final word.

Theorycrafting uses math quite a bit, but it’s not the math that makes theorycrafting useful. It’s the angle of attack that makes a solution either wrong or right. The BIGGEST point I want people to take away from this entire post, is that math by itself is useless. You NEED context and a well thought out angle of attack for the problem you’re trying to solve, or you’re not going to get anything useful even if you put all the math in the world behind it.

Formulas

There are lots of random formulas that are essential in modeling anything in game. I’ll list the ones blood DKs care about, and go over them a bit.

Melee swing interval:

math

So at first glance, this looks REALLY messy if you aren’t math-friendly. What the hell even is that symbol on the bottom left!?!?

It’s actually really simple once it’s broken down. the \prod_{i=1}^n symbol means to multiple all items from 1 to n. So if you had three items, you would just multiply them together item1*item2*item3. What are our items? \text{hastebuff}_i! All this is saying is take all your haste buffs, divide them by 100, add 1 and multiply them together. Let’s say you had a 5% haste buff, and a 10% haste buff. that entire bottom left half would simply be (1+\frac{5}{100})\times(1+\frac{10}{100}) = (1.05\times1.1) = 1.155. Essentially this just says that having those 2 buffs is that same as having one 15.5% haste buff (remember that going from a % to a decimal simply means dividing by 100).

Now for the right side. This time the special symbol is on the inside, and it’s saying a very similar thing. It’s simply the sum of all your haste ratings. If you had a piece with 500 haste, and a gem with 20 haste, and a +5 to dexterity vest, all these would sum to one value. So you can simply replace that entire numerator with “your total haste rating”, leaving the entire bottom right side as saying “this much haste is worth a buff of this size”. If you had 1000 haste rating, the bottom right would equal 1+\frac{1000}{9000} = 1.11111, or a buff worth 1.11% (rounded down).

So why 9000 on the bottom right? This is a bit of a simplification. It’s actually \frac{\sum_{k=1}^n}{90}\times\frac{1}{100}, because the haste combat rating right now is 1% of haste for every 90 haste rating, and the 1/100 is just to convert the percentage to decimal form. When they buffed haste for everyone a few months ago by changing the combat ratings, this number went from 10000 to 9000 because the combat rating went from 100 to 90.

Putting this all together

So how does this all work to give you a swing interval? Suppose you had something that occurred every 2 seconds. How often would it occur if it went twice as fast? it would simply be your speed divided by a multiplier of your change in speed, or 2\times\frac{1}{2} = every 1 second. This is the exact same thing that’s going on with this equation. If you have no buffs and no haste, the bottom left would simply be 1+\frac{0}{100}= 1, and the bottom right would be 1+\frac{0}{9000} = 1, making the entire bottom of the equation 1\times1 =1, meaning you are just left with the original weapon speed divided by 1, which means no change. If you had enough haste rating and buffs to double your weapon speed, it would be the weapon speed over 2, or half the original swing interval.

Real world example:

Let’s find out how often you will swing with 1500 haste and fully raid buffed. Your raid buffs would be 5% from Dps DKs’ Unholy Aura, or Priests’ Mind Quickening, etc., and another 10% from our passive Veteran of the Third War, which increases our haste by 10%. This makes the bottom right of our equation equal to (1+\frac{5}{100})\times(1+\frac{10}{100}) = (1.05\times 1.1) = 1.155. With 1500 haste rating, our bottom right looks like (1+\frac{1500}{9000})=1.16667. This means our entire denominator is equal to 1.3475. Divide our swing timer for 2h weapons (3.6 seconds) and you get our answer: you swing every 3.6/1.3475 = 2.6712 seconds. Now there is an important factor at play that is not included in this calculation: Parry haste.

Parry Haste

The mechanics of parry haste are fairly simple. If you have at least more than 20% of your swing interval remaining and you parry an attack, you get 40% of your weapon speed (so for us, .4*3.6 = 1.44 seconds) reduced from the total time remaining.  For any (differentiable) function, you can find the average value with \mu = \frac{\int_{a}^{b}f(x)dx}{a-b}, in this case since we are working with swing remaining between 0% and 100%, the a-b is simply 1, meaning all we have to do is integrate. Since the value doesn’t start to diminish until you reach 60% away from your next swing, the function will actually be a flat line at the full 40% until it reaches .4 on our coordinate system (x=0 is 100% remaining, and x=1 is 0% remaining, so x=.4 is 60% remaining). After it reaches this point it diminishes its value until it reaches 0 at .8, since it can’t reduce our time until next swing below 20% remaining. The resulting function is CodeCogsEqn (1)

Which looks something like this if you plot it:save (1)


(if you’re wondering why we stop at 1 and not .8, it’s because our function still exists between .8 and 1, it’s value is just 0)

Solving for the average value using our equation from earlier, we get:

\mu = \frac{\int_{a}^{b}f(x)dx}{a-b} = \frac{\int_{0}^{1}f(x)dx}{1} = \int_{0}^{.4}(.4)dx+\int_{.4}^{.8}(-x+.8)dx+\int_{.8}^{1}(0)dx = .16+.8+0= .24 swings gained through parry haste per successful parry.

Once you know your swing rate, and the bosses average swing speed (Boss swings are usually pretty consistent outside of when they are doing mechanics, so it’s easy to estimate from logs), you can find the theoretical value from your total swings per minute. In the formulas from earlier, we found that with the values we were using we would get 2.6712 seconds between swings, resulting in 60/2.6712 = 22.462 swings per minute. Let’s say your were fighting a boss with a 1.8 second swing timer and had 25% parry chance. Over 1 minute you would have 60/1.8 = 33.33 chances to parry, and on average 8.33 of them would be successfully parried. At an average of .24 swings per parry from parry haste, this results in .24*8.33 = 2 swings in that minute, meaning 22.462+2=24.462 swings in total per minute. In terms of swing interval, this is 60/24.462 = 2.4528 seconds. This means in this situaton, parry haste reduced our average swing interval by .218 seconds.

Remember that these are AVERAGES. This math is beyond useful for looking at thing in terms of total value, or over a given time period, but you have to keep in mind this is simply an average swing timer. In reality your swing interval will vary and average out to be the number you find here over any chunk of time where you are able to consistently hit the boss (obviously leaving melee range affects your swings/minute).

Rune regeneration speed:

Calculating your rune regeneration is very similar to calculating swing speed. In fact the formulas look almost identical, because they both benefit from haste in a similar fashion.

math

They are so similar in fact, if you look close enough you can see that I made this formula by taking the other one and editing it with paint!


The reason these are so similar, is that in both cases you are just scaling the value down based on haste in the same way. So instead of an initial weapon speed of 3.6 seconds, we have an initial rune regeneration of 10 seconds. If you used the same stats we used in our swing speed calculation (1500 haste), this would result in a base rune regen speed of 7.4212 seconds. The reason I say base, is because this is before any rune regen talents are factored in (we’ll get to those later).


Weapon based ability damage:

All weapon based abilities have the  same basic structure for how their damage is calculated. That structure is: \text{total damage}=(((\text{weapon damage}+\frac{3.3\times\text{AP}}{3.5})\times \text{weapon damage coefficient})\times .6791)

Let’s break it apart piece by piece…

The first part is “weapon damage”. This is simply the actual damage your weapon does, based on the tooltip of the weapon. For example:save (1)Notice how the damage is a range. It can be as low as 1659, and as high as 2490. So when we want to find the average damage for our weapon based ability, we simply find the average of this value (in this case, (1659+2490)/2 = 2074.5).

The next part is simply a universal constant applied to your AP. It basically means that all weapon based abilities will scale the same, and relatively (not exactly) in line with how non-weapon based abilities scale with AP, assuming a reasonable weapon ilvl progression.

The next part is what I call the “weapon damage coefficient”. this is simply how much the ability does on the tooltip. For example, Soul Reaper’s inital damage component is a weapon based spell, and it hits for 85% of weapon damage, meaning you should use a weapon damage coefficient of .85 when calculating that portion of Soul Reaper’s damage (don’t forget to add the DoT component’s damage as well if applicable).

Finally the “.6791” is simply accounting for the bosses armor.

Let’s calculate Death Strikes average damage as an example, and assume 8k AP as well as the item above.

Our avg weapon damage is (1659+2490)/2 = 2074.5, our damage coefficient is 2.7 (135% is what is on death strikes tooltip, but blood gets double Death Strike damage from Veteran of the Third War, which gives us 135%*2 = 270%, so our coefficient is going to be 2.7).

(((2074.5+\frac{3.3\times{8,000}}{3.5})\times {2.7})\times .6791) = 17,634 damage on average for non-critical hits.

Accounting for Crits

If you wanted to get your average Death Strike including criticals, you’d simply to take your crit % and multiply the number we just calculated by 1+that crit chance. So if you have 50% crit chance, your average Death Strike damage would be (damage for non crits)(1+.5)=17,634*1.5=26451.

NOTE: This calculation is based on a static AP, meaning one that does not change. In reality, your AP will fluctuate, making this a general estimate for an abilities damage. How well you estimate your average AP will affect how accurate this is. This is still very useful in comparing two abilities, however. For example, this formula is how we used to calculate when to use Blood Boil and when to use Heart Strike back when they were both in the game. You just set them equal and solve for AP to find the tipping point.

Non-weapon ability damage:

Non-weapon ability damage is much less complicated than weapon based ability damage. Instead of the mold we used above, their model is simply 1+\text{AP coefficient}\times \text{AP}. Death Coil for example, has an AP coefficient of 80%. To calculate it’s damage for non-criticals, you simply take 1+.8*AP. Assuming the same AP as before, and you get 6,401 damage. The “1+” is likely to ensure you never do exactly 0 damage if there is some debuff that results in an AP of 0 or something.


Calculating odds of events (statistics)

stochastic

An intro to statistics

Statistics is just combinatorics with a denominator (math joke). In reality, statistics is a HUGE field, and i’m only going to cover the absolute basics necessary to math out the parts of blood DK math that use statistisc, and no more than that. The heart of statistics is basically just finding out how many you have, versus how many there are in total.  For example, say I have 50 sparkly Celestalon plushy toys. 25 of them are the green, 15 of them are blue, 8 of them are purple, and 2 of them are orange (see what I did there?). If you pick 1 plushy, are the chances for finding a given color?

For any given color you’re going to have n/50, where n is the number of that color there are in that entire set. You have a 25/50 chance of getting a green plushy, while only a 2/50 chance of getting an orange one. If you’re wondering, there is a 0% chance you find one named after you.  The important thing to notice here is that all the %s add up to 100%. 25/50+15/50+8/50+2/50=50/50. If you end up with a system where the total odds of everything don’t add up to 1, you’ve done something wrong and should probably check your work. Essentially, (the chances of things happening)+(the chance of things not happening) should = 1, because our whole concept of reality depends on it.

Bernoulli was the best theorycrafter

Pretty much EVERYTHING in WoW is what is called a Bernoulli trial (named after some old guy named Bernoulli), which means a series of events each with the same probability and only 2 outcomes. The most common example of this in reality is probably a coin flip. A coin flip is a Bernoulli trial because you have 2 outcomes (heads or tails) and the probability is the same each time (50% for each outcome). Something doesn’t have to be 2 sided to be Bernoulli though. Take a dice roll. Rolling a dice has 6 outcomes (20 if you’re cool), but rolling a dice repeatedly can still be a Bernoulli trial if you define what is a success, and what is a failure. For example, if you define rolling a 1,2,3, or 4 as a “success” and a 5 or a 6 as a “failure”, then your two outcomes become (1,2,3, or 4) and (5,6). In other words, it was either one you wanted or it wasn’t. This is clearly a Bernoulli trial now, because you have 2 outcomes and the probability for success is the same each time (4/6).

So how does this all apply to WoW? Think about it: wow is BUILT on Bernoulli trials. You either crit or you don’t, and the probability is always equal to your crit % (that’s a Bernoulli trial). You either multistrike or you don’t, and your chance of multistriking is always the same and dependent on your ms % (another Bernoulli trial). The boss swings at you and you either parry the boss or you don’t, and your odds of parrying are always equal to your parry % (Bernoulli). You white swing at the boss, and it either hits or it doesn’t (Chef Ber-noulli). You either proc Runic Corruption on this next swing or you don’t (Brrrrrrrnoulli i’m getting chills from all these Bernoulli trials). You kill a boss and he either drops the loot you want or he doesn’t, and the odds are the same each time (Ber-noloot-oulli). The chances that a mechanic goes on a specific raid member (YOU ARE NOT PREPARED-OULLI!).

Do you see now the power of the Bernoulli trial? The vast majority of wow probability is simply a bunch of Bernoulli trials.

Discrete Distributions

So now that we have our Bernoulli trials, how do we find out things about them? The answer is statistical distributions! To put it simply, if you have a type of process (in this case Bernoulli trials, but we will use Poisson in a bit as well), you can get different information out of it by running it through different distribution models. Think of it this way: Setting up a problem as a type of process is like creating a specific lump of clay, and different distributions model that clay to give you something unique to that distribution. Each distribution gives you different information. Here is a quick little table that lists a few common ones that we can use on Bernoulli trials:

Geometric Distribution – tells you how many trials until the first success

Binomial Distribution – the number of successes out of a certain number of trials

Negative Binomial Distribution – tells you how many trials until rth success (if r=1 then it’s exactly the same as the geometric distribution)

There are MANY more, but these 3 are all we need for the questions we need to answer in wow that function as Bernoulli trials.

For any of these distributions, you can find the probability that your random variable is equal to some value with P(X=x)=f(x) where f(x) is some function that will be different with each distribution. For example, if you wanted to know the probability that you get heads 3 times you would find P(X=3) of a Binomial distribution. Statistics has a special property that makes it easy to find answers though: Everything has to equal 1. Meaning if you want to know the probability that you DON’T get heads three times, you would just find 1-P(X=3) instead. This is a lot easier than calculating each other value independently, as that would involve adding up each probability P(X=1)+P(X=2)+P(X=4)+….until you reach x=n where n is the last outcome.

You can also find averages using distributions. Just like each distribution has its own f(x), it also has its own function for finding the expected value, or E(x). We actually already saw this once in our Runic Empowerment example at the top. What we did there was use a negative binomial distribution to find the expected number of occurrences until the 2nd success, which we found to be 4.44 GCD, meaning on average it will take 4.44 GCDs (1 GCD = 1 trial) to get your 2nd RE proc.

Now that we know what distributions are and how they are used, let’s look at the three we listed here

Geometric Distribution

As already stated, the geometric distribution can tell us things about the number of trials it takes to get the first success. it’s P(X=x) tells us the probability that the xth trial is the first success, and the mean tells us the average number of trials necessary. The actual functions for these are as follows: P(X=x)=(1-p)^{x-1}p E(x)=\frac{1}{p}

So let’s do some applicable real world (of warcraft) examples.

What is the probability that it takes 4 casts of a spell to get the first critical given 30% crit chance? Simply plug in the values p=.30 and x=4:

P(X=4)=(1-.30)^{4-1}.30 = .70^{3}\times .30 = (.343)\times(.30)= 0.1029 = 10.29\%

Now what is the expected value E(x) of the number of casts until your first critical with 30% crit chance?

E(x)=1/p =1/.30 =3.333 \text{ casts}

What is the probability that it takes fewer than 4 casts of a spell to get the first critical given 30% crit chance?

P(X<4)=P(X=1)+P(X=2)+P(X=3)

=(1-.30)^{1-1}.30+(1-.30)^{2-1}.30+(1-.30)^{3-1}.30 = .70^{0}\times .30+ .70^{1}\times +.30 .70^{2}\times .30

=(1)\times(.30)+(.70)\times(.30)+(.49)\times(.30) = .30+.21+.147=.657=65.7\%

So why didn’t we use the trick I mentioned before? why couldn’t we just do 1-P(X=4) instead of adding the others? We still have 2 outcomes (you either crit or you don’t), but the range of our random variable (the random variable being the number of trials) could be any integer greater than 0. It is EXTREMELY unlikely, but still possible to have to wait 1,523,688,101 casts to see your first crit. If our set was {1,2,3,4} we could use 1-P(X=4) because that would leave us with {1,2,3}, which is the same as X<4, but since we have an infinite support our set is {1,2,3,4,5,….,∞} so just removing X=4 doesn’t give us X<4.

Binomial Distribution

The binomial distribution is used to find the number of successes out of n trials. It’s P(X=x) gives us the probability that there are x successes out of n trials. It’s calculated as follows: P(X=x)=\binom{n}{x}p^{x}(1-p)^{n-x} and E(x)=np

Note: if you’re not familiar with the \binom{A}{B} notation, it is called “choose notation”. Basically it tells you how many ways you can choose B items out of A items. How many ways can you pick 2 items out of 3? To do this by hand, we simply add up the different ways: (picked, picked, not picked) is one way, (picked, not picked, picked) is another, and finally (not picked, picked, picked) is the last way. So we know by looking that there are 3 ways to arrange 2 out of 3 items, so \binom{3}{2} should give us 3. While in practice it’s usually easiest to use wolfram to calculate these things (you can just type “(3 choose 2)” to get the answer), you can compute this analytically as well. \binom{A}{B} = \frac{A!}{B!(A-B)!} = \frac{3!}{2!(3-2)!}=\frac{6}{2}=3. Any time you see this notation, this is what how you compute it.

Examples of binomial distribution:

A super applicable example is multistrike, but I’ll save that for it’s own section. Instead, let’s keep with the crit example and find the probability that you get at least 2 out of 3 casts to be critical with 30% crit chance, as well as the expected number of crits for 200 casts with 30% crit chance.

The chance for 2 successes out of 3 casts with 30% success rate is P(X=2)=\binom{3}{2}(.30)^{2}(1-.30)^{3-2}=(2)(.09)(1-.3)^{1} = .126 = 12.6\%

The expected number of crits out of 200 cast with 30% chance is E(x) = np = (200)(.30)=60 \text{ crits}

What about the chance that you get at least 1 crit? This is a place we can use that 1-f(x) trick, because even if your set is huge, “at least one” simply means “not zero”, which means we can answer this by simply finding 1-P(X=0). For example, lets find the chance you don’t get any crit in 10 casts of a spell, again with 30% crit chance.

P(X>0)=1-P(X=0)=\binom{10}{0}(.30)^{0}(1-.30)^{10-0}= (1)(1)(.70)^{10}= .02825 = 2.825\%


Negative Binomial Distribution

Unfortunately it’s not a simple as taking the binomial distribution and multiplying it by -1 (and hopefully by now the thought of a negative probability should feel really weird to you).

This distribution tells us things about the number of trials it takes to reach a certain number of successes (which should sound a lot like the geometric distribution already covered). It’s P(X=x) gives us the probably that you get the rth success after x trials, as is defined by P(X=x)=\binom{x-1}{r-1}(1-p)^{x-r}p^{r} and the expected value is E(x)=\frac{r}{p}

Because we will use some more examples of negative binomial distribution in the section covering t60 talents, let just stick with the crit examples for now.

What is the chance your 3rd crit happens on your 8th cast of a spell?

P(X=8) = \binom{8-1}{3-1}(1-.30)^{8-3}(.30)^{3} = \binom{7}{2}(.70)^{5}(.30)^{3} = (21)(.16807)(.027)=.0953=9.53\%

What is the chance you get your 2nd crit before your 4th cast? (note: P(X=1) is 0 because you can’t have 2 crits in 1 cast)

P(X<4) = P(X=1)+P(X=2)+P(X=3)=0+\binom{2-1}{2-1}(1-.30)^{2-2}(.30)^{2}+\binom{3-1}{2-1}(1-.30)^{3-2}(.30)^{2}=\binom{1}{1}(.70)^{0}(.30)^{2}+\binom{2}{1}(.70)^{1}(.30)^{2}=(1)(1)(.09)+(2)(.70)(.09)=.216=21.6\%

What is the expected number of casts to get your 5th crit?

E(x)=\frac{r}{p}=\frac{5}{.30}=16.66667 \text{ casts}


Statistics applied to various blood things (Runic Empowerment, Runic Corruption, Multistrike, etc.)

Runic Empowerment

nzu2igx


The raw numerical value of RE is as follows: 100% of a rune on proc and 45% chance to proc gives us 100%*45%=45% of a rune per cast of Death Coil, however we already looked at why Runic Empowerment a bit in the beginning, and I claimed that we could use a negative binomial distribution to find that it is actually terrible. Is that true? First let’s verify that it is in fact a Bernoulli trial. You either have a success (RE proc) or a failure (no RE proc), and the probability is consistent each time (p=.45), so definitely Bernoulli. But do we want to use the negative binomial distribution? We’re looking for information regarding the second RE proc, because we need 2 to get our Death Strike back. Since we are looking for an rth success where r>1, and we’re dealing with a Bernoulli trial, we can surely use the negative binomial distribution!

First let’s verify my claims from before that the average is going to be 4.44 casts: E(x)=\frac{r}{p}=\frac{2}{.45}=4.44 casts which means we were right!

Second, let’s use our new knowledge of distributions to find the probability that we get our second success in 4 or less casts: P(X\leq4)=P(X=1)+P(X=2)+P(X=3)+P(X=4)=0+.2025+.22275+.18377=.60902=60.9\%

Why is this not good? Isn’t a 50%+ chance means it’s more likely to happen than not?

61% is certainly more than 50%, but considering this is the chance that we can even react to damage within 4 entire seconds of getting rid of our last FU pair, 61% is pretty terrible. If you could get paid $100 dollars to be part of an experiment that had a 61% chance of success, there’s no way you would risk it (or at least I hope you wouldn’t).

So what % does it need to be “reliable”? This is where the math gets fuzzy. There is no n% such that n is considered reliable and (n-1)% is considered unreliable. It’s not black and white like that. When comparing RE and the other options, you have to at some point use this math to fuel an inherently subjective conclusion. RE is bad enough that pretty much everyone I know worth a salt has come to the same conclusion: don’t use RE.

 Runic Corruption

Runic Corruption is a bit more straight forward. In terms of pure throughout it’s a little behind RE, but it doesn’t the same all or nothing return as RE in that you don’t to spend your FU pairs to get FU pairs back. You have a 45% chance to get 100% rune regeneration rate for n seconds, where n is equal to 30% of your rune regen (the tooltip says 3, but that’s just based off the 10 second base rune speed and doesn’t reflect any haste). If we were to model this with just one use and one pair of runes, this would lose value if you had less than n seconds remaining on your rune regen, but since we always try to keep at least 1 FU pair recharging anyway, this is not an issue and you will almost always get full value if you are playing well (capping runes is bad in general, regardless of your talent choices). This means that the value of a single Runic Corruption proc is simply  30% of a rune, for 3 runes, with a 45% chance to proc. This gives 30%*3*45%=40.5% of a rune per cast of Death Coil. This backs up what I said earlier regarding it being slightly behind Runic Empowerment (which has 45% of a rune per cast), however it is much more reliable. Lets look at the same probability as we did with RE.

Since we only need 1 proc to get return, we are not looking at a negative binomial distribution anymore, but rather a geometric distribution. Let’s look at the expected number of casts of Death Coil before we get return: E(x)=\frac{1}{p}=\frac{1}{.45}=2.22 casts of DC on average before we get return, which is twice as fast as the expected value for Runic Empowerment. What about the same P(X\leq4) calculation we did with RE? P(X\leq4)=P(X=1)+P(X=2)+P(X=3)+P(X=4)=.45+.2475+.13613+.07487=0.90849\%

This is so much more reliable than the 61% we got for RE returning something in the same time frame. Note how I said returning SOMETHING, not returning an FU pair. We have been talking about “return” without defining it. In the cast of RE, it was a full FU pair, as only getting one or the other was as useless (in terms of death striking) as nothing at all. In the case of RC, return is simply a bit of rune regen time, and you still may not have a full DS at the end. The idea is that while they are much less potent, the returns are far more consistent. The even and consistent return for only a slight loss in overall throughput makes Runic Corruption a much better option that Runic Empowerment, and it also requires less game knowledge and set up to use, as you don’t need to game it to get FU pairs back.

Blood Tap

There is no probability regarding Blood Tap. You use Death Coil, you get return. Simple as that. It gives you 2 charges per cast of Death Coil, and requires 10 charges for a Death Strike, meaning you get 1/5th of a DS per Death Coil, or 40% of a rune (20% of 2 runes). You’ll notice the “expected value” of this would be 5 casts of Death Coil, which is even worse than Runic Empowerment! How can that be!? Remember Runic Empowerment forces you to spend you Death Strikes to get them back, which is not the case with Blood Tap. 5 casts of Death Coil with Blood Tap does not mean 5 casts without Death Strike, as you can hold on to your other pair until you need it. There is another layer of flexibility though, as unlike Runic Corruption you can hold the RETURN, as well as the previous FU pair. So while this has the longest time between return, and the lowest throughput, if you time your Death Strikes well then the flexibility this provides is simply unmatchable in terms of value. This is the reason that Blood Tap is widely (and correctly) regarded as the best option for blood. Combine this with the fact that it returning D runes means you can trade out Death Strikes for Blood Boils to gain more aoe damage, and it makes it even more clear than it already was. Notice how there are no numbers to support this, which goes back to me first big point of this post: math isn’t the only tool you have.


Breath of Windragosa

First of all, I apologize for the long gap between posts. The school boss has a tight enrage timer, so I need to stay on top of the damage check so to speak. Speaking of damage check (*cough* nailed the segue *cough*), many DKs have been using Breath of Sindragosa to get incredible damage, and some of the top logs have blood DKs doing more damage than most dps classes on cleave fights. In this post we’ll go over how this is possible, and why behind the very impressive powerful dragon’s breath holding Blood DK at the top of the meters is actually hiding a very meek tank damage wise.

sindy

Defile vs Breath of Sindragosa

So let’s start with finding what it takes for Breath of Sindragosa (BoS from here on out) to match defile for various conditions.
defile’s damage is calculated as:  \sum_{k=0}^9.33AP\times1.025^k
and BoS’s damage is calculated as: (AP+\frac{AP}{n}\times(n-1))\times t
where n is the number of targets including the primary target and t is the time BoS is up (which is equal to the total number of ticks, since you get 1 tick per second). Before we just mash these two together and solve the equation for t, we have to set up a few things. First, your number of defile casts and BoS casts will depend on the fight length. Generally speaking if the boss lasts 3.5 minutes, you will get 2 casts of BoS (one at the opener seconds and one when you hit your second pot). If the boss lasts 4.5 minutes you will get 3 off, one at 0 seconds, 120 seconds, and then when you hit your second pot. (obviously mechanics may adjust these numbers, but let’s keep it patchwerk for now). So our equation should look something like this:

n \times \sum_{k=0}^9.33AP\times1.025^k\times \text{number of Defile casts} =

t \times (AP+\frac{AP}{n}\times(n-1)-\frac{.85AP}{2})\times\text{number of Breath casts}

I’d love to give really cool graphs and give really intricate data with multivariable analysis, but I don’t have the software for it so we’ll have to resort to the old fashioned method… SPREADSHEETS!!!

Here is a rough breakdown of the number of ticks needed for BoS to outdo defile per use of BoS:

And keep in mind that these are the required ticks to at least break even. To get above and beyond the damage of defile you’ll need to go above and beyond these tick counts, up to and including near 100% uptime.

breath2

So with the spreadsheet from before we now know how many ticks it takes to match Defile’s damage given different scenarios. These numbers are very attainable, but due to how our multistrikes work in relation to BoS it creates a problem.

for any given ability, to be “viable” you need to have both potency AND some level of consistency. Take two imaginary abilities:

ability A – Deals 100 damage, 1 minute cooldown

ability B – Has a 50% chance to deal 1000 damage. 5 minute cooldown.

Statistically speaking these will both do 100 damage per minute, but the first ability is DEMONSTRABLY better. If every other pull you are getting 0 damage out of that spell, it’s not a good spell, even if “on average” it provides the same results. Obviously no spells like this exist, but the point stands that reliably has value that is tangible, even if it can’t always be measured. So how does this apply to BoS?

Without any multistrikes at all (as if you were out of melee range) breath falls in about 13 seconds assuming no AMS soaking (a bit longer if you’re a blood elf), and given the spreadsheet above in order to even be considered taking as a talent you need to get at least 20 ticks out of your breaths on average, which means a HUGE amount of BoS’s uptime is multistrike dependant. In order to be viable, the cost per second of breath has to be such that you can have the time needed for multistrike to do its thing. The problem arises when you figure out that the cost has to be pretty low (as it is now with 15/second) to allow for this to happen reliably. Any higher cost and you are unable to to reliably get the damage you need to match, let alone beat defile.

Why does it need a low cost? Why can’t you just compensate with higher multistrike rating?

It’s not JUST about multistrike rating, it’s also about multistrike opportunities. You can have all the ms chance in the world, but you’re still limited by how many chances you actually have to multistrike, and nerfing the cost of breath actually double dips with punishment. You have to generate more RP and you lose it faster, meaning less time for auto attacks. In other words you need more multistrikes with fewer multistrike opportunities. At the end of the day, a slight increase of the cost would require MASSIVE compensation in multistrike rating to recieve the same result.

Let’s say you have 50 RP, and have just put yourself in a xBxDxD rune configuration and have 5 stacks of BT, meaning you’ll have 40 rp from runes (without using glyphed Chains of Ice) to use in the next ~7 seconds.

With just the rp listed here, breath will fall in 6 seconds, so we need to extend our breath by at least 2 seconds to reliably hold onto breath (to account for the GCD to actually use the runes we’ll get in 7 seconds), and to do this we need 2 multistrikes in 6 seconds, or in 3 auto attacks (t = 0, ~2.9, ~5.8). 3 auto attacks gives us 6 chances for multistrikes. How much multistrike do we need to reliably get 2 multistrikes over 6 auto attacks? (Let’s define “reliably” as at least a 75% chance to get both multistrikes.)

This can be calculated by solving for ms% in the following:

(chance for 2 ms)+(chance for 3 ms)+(chance for 4 ms)+(chance for 5 ms)+(chance for 6 ms) = .75

but there is an easier way. Instead of calculating the chance for 2, 3, 4, 5, or 6, just calculate the chance of NOT having 0 or 1 (remember, they all have to add up to 1).

Which would be:

1-(chance to get 0 + chance to get 1) = .75

1-(\left(\begin{array}{c}6\\ 0\end{array}\right)\times x^0\times(1-x)^6+\left(\begin{array}{c}6\\ 1\end{array}\right)\times x^1\times (1-x)^5) = .75

x = ~39% multistrike chance

If you’re not familiar with statistics, \left(\begin{array}{c}A\\ B\end{array}\right) is choose notation. It basically means the number of times that you have A total “rolls”, and B of them are what you want. So if you flipped 3 coins, there are three possibilities where you only get exactly 1 heads [heads-tails-tails], [tails-heads-tails],[tails-tails-heads]. Choose notation is defined by \left(\begin{array}{c}A\\ B\end{array}\right) = \frac{A!}{B!\times (A-B)!}, which in this case would be \frac{3!}{1!(3-1)!} = 3, which is what we expected since we counted ahead of time. Anyway, back to Azeroth.

So we only need a 39% mutistrike chance to reliably make breath last at least until the next set of runes given the initial condition of 50 rp and 5 stacks of BT. (keep in mind this is with our definition of “reliable” as a 75% chance to be successful. You can obviously get the same results with less multistrike, but you run more risk. This risk can be partially mitigated by using ERW and PL optimally to help extend BoS to the required length (which was mandatory in early t17 with ~1000 multistrike, however it was still very rng dependent with that low of a multistrike rating), but those are both cooldowns and you can’t always rely on them. Looking at reliability and assuming use of either would be ignoring a common worst case scenario, which is the only type of scenario that matters when it comes to maintaining uptime.

Now on to why you can’t just bump up the cost. Let’s adjust the cost by only 1 single point of RP and do the same math again:

We still need to cover 8 total seconds, but now our RP only lasts 5.625 seconds, meaning at least one of the multistrikes HAS to occur before this point in order for us to get our 5th and 6th chances at multistrikes from the 3rd melee swing. You also need to generate more than just 2 multistrikes to last the remaining 3 seconds (2.375 seconds rounded up, because you can’t have partial multistrikes), so you now need 3 multistrikes. So a slight adjustment of only 1 rp per second in cost added deadline on the first multistrike, in addition to increasing the total number of multistrikes needed. Let’s find what ms% it takes to get the same level of reliably as before:

The chances of getting 3 multistrike off of 6 chances is very similar to what we had before:

(chance for 3 ms)+(chance for 4 ms)+(chance for 5 ms)+(chance for 6 ms) = .75

Or written more simply:

1-((chance for 0 ms)+(chance for 1 ms)+(chance for 2 ms)) = .75

Remember that the chance for all of the numbers of multistrikes needs to equal 1, because 100% of attacks will have A number of multistrikes, even if that number is 0.

If this were it, we would only need about 44% multistrike to get teh same reliability, an ms% requirement increase of only 5% multistrike chance, however the whole thing needs to be multiplied by the chance to have at least one multistrike within the first 2 melee swings, so we get the final equation of:

(1-\left(\begin{array}{c}4\\ 0\end{array}\right)\times x^0\times (1-x)^4)\times (1-(\left(\begin{array}{c}6\\ 0\end{array}\right)\times x^0 \times (1-x)^6+\left(\begin{array}{c}6\\ 1\end{array}\right)\times x^1\times (1-x)^5+\left(\begin{array}{c}6\\ 2\end{array}\right)\times x^2\times (1-x)^4)) = .75

x = ~56.9% multistrike chance, which is not currently attainable outside of trinket procs.

So we can accept that it’s not “reliable” in any attainable static multistrike, but what are the chances with with the highest attainable static multistrike?

While I only have about 1800 multistrike, but there are a few DKs with close to 2300 multistrike (spoiler alert, they’re the ones doing 40k+ on Gruul). So how likely are you to bridge this 8 second gap with the best MS currently attainable?

\left(\begin{array}{c}5\\ 3\end{array}\right)\times.498^3\times(1-.498)^2+\left(\begin{array}{c}5\\ 4\end{array}\right)\times.498^5\times(1-.498)^1+\left(\begin{array}{c}5\\ 5\end{array}\right)\times.498^5\times(1-.498)^0

~41.8\% chance of successfully bridging the gap.

What used to take about 1580 multistrike to have a 75% reliability, now isn’t even likely at 2300 multistrike. This is with just a ONE  (you can’t capitalize digits for emphasis so I spelled it out. fight me m8.) RP per second cost increase (from 15 to 16).

So the cost is as high as it can be while still being viable in its current form, but that still doesn’t show how you get 100% breath

Just because 15 rp/second is the max cost breath can have without being nearly impossible to maintain for more than a short burst (which would make it non-viable without revamping the damage SIGNIFICANTLY, but that topic is covered later), doesn’t mean it’s “expensive”. We saw that at 15 rp/sec, if you had a fresh xBxDxD configuration, 5 stacks of BT, and at least 1580 multistrike, you could make it to your next rune set with about 75% reliability, which you are going to have to do at least once to span the time required to reach the minimum tick count for matching defile. Remember that 2300 ms rating I mentioned? Well if you manage to get that much multistrike (there’s nothing significant about that number, it’s just currently the highest multistrike the top parsing DKs are achieving), what are the chances that you will cover that gap with 15 rp/sec?

1-(\left(\begin{array}{c}6\\ 0\end{array}\right)\times.4985^0\times(1-x)^6+\left(\begin{array}{c}6\\ 1\end{array}\right)\times.4985^1\times(1-x)^5) = 88.92\%

This is much more reliable, and we are almost at the point where unless you have very bad rng, you could maintain breath indefinitely, there just needs to be a bit more rp gen from somewhere….and that’s where glyphed chains of ice comes in.

synonSr

I know, it’s weird. The devs are very much against this current design, but it’s currently optimal to help extend breath to 100% with the use of glyphed Chains of Ice. Now I know what you’re thinking, surely you lose more damage than you gain, but think of it this way: At best a cast of Chains will rescue an otherwise doomed breath from a bad rng streak, and allow for a very large number of ticks to occur down the road. At worst, you lose breath soon anyway, but you get at least one extra trick, which is equal to 100% of your AP, so you can think of Chains having a damage of 100% AP, even if delayed by a bit. Compare this to Death Strike, which does 270% weapon damage per 2 runes.

Death Strike (per rune) = (((\text{weapon damage}+\frac{3.3\times AP}{3.5})\times 2.7)\times(1-.3209)\times .5

Chains of Ice = AP

AP/(((\text{weapon damage}+\frac{3.3\times AP}{3.5})\times 2.7)\times(1-.3209)\times .5 simplifies to AP/(0.9168\times \text{wpndmg}+0.8644\times AP). So given about 9k AP (this will fluctuate with procs, but not by so much that it makes this calculation meaningless) and a weapon of ilvl 700 (which gives an averaged weapon damage of 2074.5), this puts a Chains of Ice “cast” at about 93% of Death Strike’s damage per rune, which is insane……except it’s really not. Death Strike is very strong, and it’s far and away our highest damage ability per execute (not counting breath, which isn’t really a fair comparison). Despite this, Breath of Sindragosa is around 40% of our damage when we can maintain it 100% of the time, which is INSANELY high relative to our actual rotational abilities.

What does this show? It shows that our other abilities are very underpowered. Breath of Sindragosa isn’t SUPPOSED to be up full time. The fact that we are making it do so should mean that we are WAAAAY far ahead on damage…but we’re not ahead by as much as you’d expect (though we are very much ahead), and that’s simply because the brokenness of Breath is hiding how little everything else we have hits for. Death Coil hits for clown shoes, Blood “Boil” single target is more like a simmer. Just for a fun “what if game”, let’s take the highest tank parse on Gruul, Paragon’s Vereesa and his Blood DK kill on March 25th, with a very impressive dps of 43.9k. The highest non-DK parse is Alestørm the monk, with an equally impressive (relative to class) 38.5k. Without changing anything else, let’s put all of Vereesa’s RP spending into Death Coil instead of Breath, using the same crit% and ms% that Breath got.

He had a total of 273 total ticks of Breath, with 243 normal ticks, 93 multistrike hits (not counted in total), 30 crits, and 35 multistrike crits (also not counted in total). His average hit amount was 16,714, which gives us an average AP of 16,714 (in reality, a lot more than AP goes into this. Blood presence, versatility, all boost this beyond AP, but because everything that affects Breath also affects Death Coil and Defile, for the sake of simplicity we can treat them all as “AP”) and had a total damage from breath equal to 5.21 million.

He also had 6 total Death and Decay casts, which would turn into Defile casts were he not using Breath. His D&D had 66 total hits, with 54 normal hits, 12 crits, 74 multistrike hits, and 8 multistrike crits.

Death Coil is worth 85% AP per cast, and with 273 ticks of breath you would have replaced 273/2 = 136.5 casts of death coil.

121.5 of these were normal hits, which each would hit for an average of 14,206.9 damage.

15 of these were critical hits, which would average 28,413.8 damage

There were 46.5 multistrike hits, averaging 4262.07 damage

And finally there were 17.5 multistrike crits, averaging 8524.14 damage

For a grand total damage of: 1.726m + 0.4262m + 0.3964m + 0.1491m = 2.6977m

Now for Defile instead of D&D, which will lessen the blow a bit.

Defile is worth 33% AP per tick, growing in strength by 2.5% each tick. The formula for this (as we found in the beginning of this post) is \sum_{k=0}^9.33AP\times1.025^k which can be simplified to .33*AP*11.2034, so a normal average tick (assuming all ticks hit, which they did in this case) would be worth a tenth of that value with our given AP, which would be 6179.37 per normal tick.

54 normal hits would result in 333,685.98 damage

12 crits would result in 148304.88 damage

74 multistrikes would be 137,182 damage

8 multistrike crits would be 29,660.98 damage

for a total of: 0.334m + 0.148m + 0.137m + 0.03m = 0.649 million.

So to recap:

total gains are 0.649m + 2.6977m = 3.3467m

total losses are 5.21 + 0.1589m = 5.3689m

net gain: -2.02m damage, which would result in a total damage done to 10.207m, down from 12.23m, and a dps of 36,718 down from 43,992. A 16.5% nerf.

Putting this into context

google-ranking

Now, being underneath the top monk parse is not in and of itself an issue, and if your complaint so far is that we aren’t the top tank anymore then you’re missing the point entirely. Let’s apply this 16.5% nerf to all blood DK parses and compare to the other tanks (using 95th percentile to keep things at decent skill level while still allowing for parses that aren’t DRIPPING with good rng or that don’t have 2300 multistrike).

As of writing this (Evening of March 27th) the breakdown looks like this (remember this is for Gruul, so purely single target):

Blood DK is at the top with an average of 32,610.9

Brewmaster monk is next with 30,858.1

Guardian Droood is next with 29983.9

Protection Warrior comes next with 29,181.5

and finally Protection Paladin with 28,339.0

This makes the mean for tank damage 30,194.68 damage, with Blood DK being ahead of the mean by 8%, monk and druid being about right on the money, prot warrior being behind the curve by about 3%, and paladin being dead last by about 6.2%.

Apply the 16.5% hit of being forced into Defile to the average Blood DK parse, and you now have Blood DK doing 27,230 damage on average, which is over 1k below the previous bottom. The new mean for tank damage would be 29118.5, putting monk ahead by roughly 6%, Bear ahead by about 3%, Warrior right on the money, paladin behind by about 2.5%, and Blood DK at the very bottom at 6.5% behind the tank mean.

TL;DR:

We do almost no damage outside of breath, and while Breath is broken it’s the only thing keeping us from being the bottom of the pack by a steep margin. Also, Paladins could use some love too apparently.

sheep

(I found the original image at http://burntfur.deviantart.com/ I simply added the wow stuff)

So what CAN be done about Breath?

Obviously despite us relying on Breath’s damage it is still broken, and being ahead of the tank mean damage by 8% is not ok (unless you’re a brewmaster monk during t15, then it’s hunky dory and it won’t change until a blanket 15% nerf part way into t16 progression. i’m not jaded at all….)

For one, the damage needs to be changed. Notice how I didn’t say nerfed, but changed, because there are 2 ways this could be done. The first way is to leave cost as is and nerf the damage. This is the most “direct” way of adjusting the situation. If you take Breath to be roughly 40% of our single target damage (which is pretty much is assuming breath has very high uptime), then changing BoS’s AP coefficient from 100% AP to about the same as Death Coil’s at 85% AP would put us more in line with the other tanks single target (this would be roughly a 6% damage nerf overall).

This still leaves blood weaving in fairly heavy amount of Chains of Ice though, which is something that does not fit within the developers design goals for the spec, which leads me to the second damage change they could make: A SIGNIFICANT buff, accompanied by an increased cost.

Instead of breath being something you maintain, it’s a cooldown that would be used for burst damage for about 10-20 seconds. You’d still pool rp, and rng would still play a role, but it would not continue to be an entire playstyle by itself like it is today. This change would best be accompanied by an adjustment of the cooldown as well, as 2 minutes is pretty long for a damage cooldown, and lowering the cooldown would make the new burst breath more consistent as they could drop the burst component by increasing the frequency of the ability. This would require a large buff to the damage however, as 100% ap per second is very small if you’re only talking 10-20 ticks. Remember that we currently need 26 ticks to even MATCH defile in the BEST POSSIBLE SITUATION for Breath, and in some cases you need 40+ ticks to match defile on single target.

The final (and by FAR the worst) option is to increase the cost, leave the damage as is, and make the talent non-viable, while buffing Death Coil significantly. This would absolutely destroy this talent’s viability for blood, and it would be extremely harmful from a player engagement point of view. BoS is an extremely engaging playstyle, it just needs tuning – not annihilation.

I’ve procced purgatory, but I’m not dead yet.

I want to apologize to anyone who follows my work on this site for the HUGE gap in posts. As a double major towards the end of school who also works part time AND who raids, sometimes I simply don’t have time to do all the things I want to do. Anyone who followed my now extinct forum guides knows that I’m not always the most punctual with updates, and that is the reason why. This post doesn’t pertain to anything tank-related, but is rather a message saying that I WILL have a new post (regarding Breath of Sindragosa; where it stands, why it needs nerfed, and possibilities of the kind of nerf they give it) sometime during spring break. I am dedicating a solid chunk of my break to getting this blog back in action.

So keep on Breathing (preferably the sindragosian kind) and know that despite a 2 month gap in posts, I’m very much not in need of a battle rez quite yet. After midterms I might need some oxygen, a large teddy bear, and ice cream, but for now I am still with pulse.

ToMjGpC3nn7Vsd5zdrG

Why isn’t Multistrike any good (for survival)?

This is question that’s asked a lot in the blood DK community, and for good reason. Many high end players stack multistrike, and it is  our boosted stat as blood, so why do so many stat rankings show it at the bottom for survival?

Well, for one it IS our best secondary stat in terms of damage output, no questions. But at the same time it’s our WORST stat for mitigation/survival. How can our attuned stat be the worst for survival?

Well, pretty easily actually. Let’s take a look.

bowlgbowlgbowlg

Get it? Multi-strike? okay…..

How Multistrike works

Much like crit, it’s an extra chance for damage whenever you deal damage. Instead of just increasing the damage like crit however, it casts 1 or 2 additional spells for 30% the damage of the original. The difference between MS and crit is that MS has 2 chances of giving value, as opposed to crit’s “all or nothing” approach. This is supposed to give MS a smoother feel compared to crit, and in that regard I suppose it succeeds.

Here’s the breakdown:

1. you deal damage

2. you get a chance equal to your multistrike % to get another hit equal to 30% of the original damage

3. you get another chance, completely independent of the first one, equal to your multistrike % to get another hit equal to 30% of the original damage

4. nothing else happens, because multistrike can not proc off multistrikes.

This means you can get 1, or 2 procs on a single hit. Because they are independent, the math behind finding the odds for each outcome is pretty simple. It’s no different than weighted dice rolls, for those of you who took any high school level statistics.

(the chance to roll no procs) + (the chance get exactly 1 proc) + (the chance to get 2 procs) = 1

turns into:

(1-n)²+2*(1-n)*n+n² = 1, where n = your current MS %.

So just to put this into context let’s say you had 25% MS chance total. The chance to get exactly 1 proc is 2*(1-.25)*.25 = 37.5% and the chance to get both procs is .25² = 6.25%.

To get this into terms of multistrike rating, simply make n = ((multistrike rating)/66+15)/100 to get your raid buffed multistrike %. So the final forms look like:

chance to get exactly 1 proc = 2*(1-(((multistrike rating)/66+15)/100))*((multistrike rating)/66+15)/100

chance to get exactly 2 procs = (((multistrike rating)/66+15)/100)²

expertisedice

Looking at total value

So now that we’ve established how MS works mechanically, we need to put it into context for how it benefits us when we do get a proc. Well for one it gives us more damage, like it does for everyone. For blood, it also gives us 15 RP every time we get a MS proc from melee attacks, which gets used on Death Coil for more damage, t60 charges, and a bit of extra health through Shadow of Death. We’re just looking at the survival portion, so we’re looking at t60 charges and the +hp.

Extra t60 procs from Multistrike

First we need to find how many auto-attacks per minute we are getting (remember, we only get RP from auto attack multistrikes). Your swing speed is determined by your weapon (which will always be at 3.6 seconds for blood due to 2h normalization) and your haste with the following formula:

Melee interval = Weapon Speed / ((buffs&debuffs)*(haste rating/10000)). With full raid buffs and a 2h weapon this ends up being 3.6/((1.155)*(1+haste rating/10000)). If you’re wondering why haste is on the bottom, remember we’re looking at the interval between hits, which should go down as haste goes up.

To put this into context, with 1000 haste fully raid buffed you would melee once every 3.6/((1.155)*(1+1000/10000)) = 2.8335 seconds. Assuming full uptime on the boss this would result in about 60/2.8335 = 21.175 auto attacks per minute (aa/min).

Now that know how to find the aa/min, we can find out in terms of aa/min and multistrike rating.

If we have x hits per minute, and a y% chance at a z valued proc per hit, our total value per minute is going to be x*(y/100)*z. For example if you roll 2 dice a minute and every time you roll a 1 you get $5, on average you would get 2*(16.6667/100)*5 = $1.67 per minute. I show you this now so you know whats going on when we combine all our stuff so far into a fairly messy bit of algebra. Since we can proc once or twice, we need to split the math up accordingly.

(aa/min * (% chance for 1 proc)/100 * 15 RP) + (aa/min * (% chance for 2 procs)/100 * 15 RP) should give us our total RP/minute from multistrike. We could write this all out as one big function of haste and multistrike, but it’s messy and for the most part useless without context. What we have here is enough to find what we want given a certain haste and multistrike. Let’s find out the amount of RP/min given by 1000 haste and 1000 multistrike.

aa/min becomes 60/(3.6/((1.155)*(1+1000/10000))) = 21.175

chance for 1 proc from ms becomes 2*(1-((1000/66+15)/100))*(1000/66+15)/100 = 0.4212, or 42.12%

chance for 2 procs from ms becomes ((1000/66+15)/100)² = 0.0909, or 9.09%

put it all together and you get:

21.175*.4212*15+21.175*.0909*30= 191.53 total RP per minute from ms auto attack procs with 1000 haste and 1000 multistrike! huzzah! well hold on, because 88.141 RP/min of that comes from the base 15% of multistrike we have with 0 ms rating and 1000 haste, so the 1000 multistrike rating actually only gets us 103.39 runic power for the whole minute. Once you factor in the rp/rune cycle from t60, This turns into 4.08 Death Coils, for a total of 81.6 Blood Charges per minute. PER MINUTE. That means it takes nearly a full 1.23 minutes to get a full Death Strike.

pYPVwEL

In comparison, that same amount of mastery gives us an extra 18.182% Blood Shield, AND an extra 9.091% AP, which means a larger initial Death Strike heal as well. There is simply no comparison from a mitigation point of view.

Shadow of Death buff

Ok but what about the Shadow of Death buff? Surely 103 RP per minute will add up to some hp! Well each Death Coil adds 3% hp for 30 seconds, so 3.45 DC/min turns out to be roughly 3.45*1.5 = 5.175% it’s a 6.11% hp gain per minute. Remember that you’re constantly losing this buff while you gain it, so that’s not a stacking hp per minute. In other words, it’s a very minor HP increase for a very large amount of stats.

EDIT: forgot to include t60 talents for the HP calculation. It’s actually 6.11% hp gain, not 5.175%.

In summation

For raw survival, we need an incredible amount more haste to make multistrike meaningful for mitigation, and the hp buff we get is miniscule. There are ways they could make Multistrike more valueble to us from a survival point of view, however. Simply adding some mitigation on proc other than (even in place of) the RP would be a fantastic start. Maybe a shield that you get every auto attack proc or something. ANYTHING but RP. As long as multistrike stays in its current form, it’s simply not going to be fixed with numbers.

The frustrating thing is we DO want multistrike, but only as a way to boost damage. It’s very similar to running crit in MoP, in that it was great for damage but terrible for survival.

TL;DR, multistrike (for survival) is poo poo.

b394cbe2e07a387162647e2c4ce87d3d

But Reniat, how do I know how much multistrike I should have?

YOU DIDN’T HELP AT ALL!

Unfortunately there is no “you should have 1.5 times more mastery than haste”. It’s simply a matter of finding the sweet spot for you as a balance of damage and survival. Feel squishy and in need of more mitigation? You should drop ms where you can and go for mastery. Do you feel you want to do more damage and are willing to take a survival hit? Consider adding multistrike.  There is no “right” amount, and the ratio you pick is 100% subjective. The only “wrong” amount of multistrike is if you CAN get rid of more but choose not to, while you are dying to not enough mitigation

Clearing up some confusion on Mark of Blackrock buff for blood

versus

Recently they announced a significant buff to the tanking weapon enchant, Mark of Blackrock. Before the nerf, if could only proc if you were hit while below 50% hp, and even then only had a 30% chance on that hit. Very bad. Now it procs if the hit takes you below 60%, so you could get a proc at any HP if it hits hard enough. It also has a 100% chance instead of a 30% chance. All this means that the uptime of this is going to be MUCH better than before, and 500 Bonus Armor is nothing to sniff at, so this has led to some blood DKs wondering how it compared to our runeforges. I decided to take some time to clarify where Mark of Blackrock stands for blood.

Spoiler alert: Keep using Fallen Crusader.

Do not enter sign

Going just off the tooltip, Mark sounds amazing, as you could have significant uptime of 500 Bonus Armor. However what’s not written is the 40 second internal cooldown. Here is a link to the blue post (with the old proc status, but the ICD is the same). So given the BEST chance of uptime, you’re still looking at only 30% (12 second duration, 40 second ICD). 30% of 500 is only 150 static bonus armor. Fallen Crusader on the other hand, has no ICD but rather goes off a rppm mechanic like a trinket. With an rppm of 3, with even 0 haste rating (fully buffed) FC is going to have an average of ~58% uptime (this isn’t accounting for the near guaranteed proc at the opening, so it’s potentially much lower than reality depending on length) of +20% increased strength, which for me is about 780 strength per proc fully raid buffed. 780 str on a 58% uptime translates to 452 strength averaged out.

This is before you even consider the fact that if you’re not taking damage enough to reliably proc Mark of Blackrock you don’t get anything. The 30% uptime from earlier was best case scenario, and if you are not tanking anything (tank swap for example) or just tanking something very light hitting, you are going to get 0% uptime until you start taking damage. Let’s say a tank swap had you taking “enough” damage and was a 50/50 split (you tank the boss equally with your co-tank). Your overall uptime of Mark would be 15%, and 15% of 500 armor is a static value of only 75 armor overall, which is not great.

spell_deathknight_frozenruneweapon

Long story short, while at first glance Mark may seem not bad for blood, we still very much want to keep using our runeforges!

Making a spaceship (creating a good user interface)

Creating a good UI

One of the most important aspects of performance in-game is a solid UI. This game is all about making good judgment calls and reacting to information as it’s given to you. You have a proc! use it. Your diseases fell off! reapply diseases. You took a lot of damage! Death Strike. You are ABOUT to take a ton of damage! Use a cooldown. Almost every aspect of the game can be narrowed down into info -> response, so if you can make the info come to you in a cleaner way you will have an easier time. This is where a good user interface comes in!

Endeavour_flight_deck_2

Taking advantage of motor learning

As I mentioned in the intro, a good user interface is all about feeding you the right information. The best way (in my opinion) is to take advantage of our natural affinity for motor learning, or the mental equivalent of muscle memory. Take throwing a ball for example. Moving your arm back, then moving your shoulder, followed by your arm then finally rotating your wrist and letting go of the ball at the exact right time to hit the spot you are aiming at. When you go to throw a ball, you don’t think about any of this (unless you are a pro in training maybe), you just “throw it”. basebal

Just like when a doctor hits your knee with that rubber hammer thingy and your leg kicks, you can train yourself to react a certain way to pretty much anything. This is basically all of practicing ever, for anything from music rehearsal to sports training. You are just training your muscles and mind to react to patterns and other common stimuli.

“How do I apply ‘practice’ to making a user interface? Reniat, are you drunk?”

-you

Just in the same way you can train yourself to react to a pitch in baseball, you can train yourself to react to stimuli in a user interface. For example, let’s say you were having a hard time keeping track of Bone Shield. You are constantly forgetting to put it back up. A hard solution would be to start training yourself to start thinking about Bone Shield every minute so that you know to check if it’s back, but that’s ridiculous as it requires you to have bone shield in the back of your mind constantly. A MUCH easier solution is to make something in your user interface pop out when bone shield is off cooldown and go away when you use it. Now you know exactly when it falls off and can reapply it instantly just be reacting to one simple icon popping up on your screen, which is where your attention already is! We can even make this pop-up smarter by checking if there are any stacks currently and only pop up if Bone Shield is up AND you don’t have any stacks, preventing you from overwriting any stacks and wasting charges. Now you are using Bone Shield like a pro and all you’re doing is hitting Bone Shield when the Bone Shield icon pops up in your screen!!!! ISN’T MOTOR LEARNING GREAT!?!?

shoelacesReniat are motor learnings
 

Avoiding Clutter/Redundancy

Another incredibly important to a good UI is to make sure it’s not preventing you from seeing that you’re standing in fire. As tanks we especially need to keep a very sharp eye on the raid/dungeon group and keep our raid awareness maxed, so putting a bunch of icons all over the middle of the screen is obviously not ideal. Making a great UI is a balance between giving as much information as possible to you on-screen in a highly noticeable manner, while minimizing the visual impact of the notification itself on the screen real estate. You will obviously want some icons towards the center of your screen, but those interface items should be things you want to see pretty much ALL the time. As tanks, our health bar/AM comes to mind. Some easy simply solutions include making icons smaller, putting them off to the side (but still close enough to the center to be instantly seen). Some more elegant solutions include adding button glow and other eye-catching but spatially small effects, as well as making the icons fit other parts of your UI like a puzzle, blending in to make a seamless and compact but info-heavy user interface.

Putting it all together

So now that we have some general grounds for a “good” UI, let’s look at putting one together specifically for Blood DK tanking. It is important to note that everyone has different tastes, because everyone reacts different to different stimuli. There is a very high chance you will HATE my user interface. Even if the interface shown doesn’t work for you, take the principles talked about above and apply them to something that works for you. The point of this post is about the concepts behind good UI elements, not “here is my UI copy it because it will work for you”, because chances are it won’t work for you. With that said let’s review everything we’ve learned so far.

A good UI:

1. Provides the info you need

2. Is not cluttered or in the way

3. Keeps the important stuff in the most visible places

4. Promotes raid awareness

So let’s start by looking at a user interface made by a very handsome blood DK (*ahem*) and breaking it down into its individual components (At the end of this post I will put links to all the weak auras scripts you see). Please ignore the fact that some components are shoddily edited in. I forgot to get screenshots during raid so I had to edit in Hermes and the raid frames.

WoWScrnShot_120414_010840

Let’s start with the most important part of my UI: my health and runes (yellow square).  You can see they are right near the center of the screen. As blood DKs, monitoring our health is paramount to solid DS timing, as you want to be able to react ASAP.  This is why I’ve chosen to display my health so prominently on my screen. There is a balance to be found in not cluttering the center of the screen and putting important info, and this is what works for me. You may choose to make it less prominent to allow for better vision and that is totally fine. Again, take what works for you and apply it. Everyone’s UI is different. This is an example of executing good ui element #3, “Keeps the important stuff in the most visible places”.

Directly below that are my cooldowns. Knowing what CDs you have available is incredibly important as any tank, but especially blood DK. If you could do nothing else other than time DS and use CDs really well, you could get very far as a blood DK.  Obviously there are more things to master, but those 2 things are the most important by far, as they are what keep you alive. By color coding the bars, I can see what is available out of the corner of my eye. If I see blue, red, and green bars then I know I have Icebound Fortitude, Vampiric Blood, and Anti-Magic available at the moment. A grey bar indicated how long until that cooldown is back, so I can see which cooldowns I’ll get back in the next few seconds as well. Using bars and colors as opposed to just actual numbers I can keep them further away from the center, and rarely if ever have to look directly at them, satisfying the good ui principles #1 “Provides the info you need”, and #2 “Is not cluttered or in the way”.

To the left of my center vision is where I track procs/infrequent but important events (red square). These are things that I want to react to immediately but are not going to occur often. It is important to note that everything in this group (Plague Leech, Defile, Crimson Scourge procs, ect.) will disappear when I use it, which is usually immediately. If they didn’t go away when used and they stayed up all the time, this would violate the 2nd principle of good UI “Is not cluttered or in the way”.

Just below the red square you can see where I track Blood Tap charges. This is a good example of using motor learning, as once I reach 10+ stacks the button gets a halo effect, alerting me to the fact that I have 10 or more stacks, shown below.

WoWScrnShot_120414_012317

To the left of the red square is where I keep track of all CDs on me. This includes externals (Pain suppression, Ironbark, Hand of Sacrifice, etc.). It is very important  to track this somewhere very viable as this is a crucial part of proper cooldown management. Tracking CDs like this let’s you know when you use your next CD to chain them without overlapping them to get max coverage. Another tool to further that purpose is Hermes (the green circle) where I can see all available external cooldowns.

You’ll notice that I only have a few spells on the screen, and they aren’t bound to anything. This is because everything is bound in Dominoes and hidden. If you can, memorizing your keybinds is a great way to save screen real estate, because you don’t have to have all your stuff on screen.

Weak Auras

I HIGHLY recommend weak auras. 99% of what you see in my UI is built with weak auras. I will put links to the strings for each component here.

Blood Tap: http://pastebin.com/vaiHbSuJ

Available Cooldowns: http://pastebin.com/0F7kZwBt (may not be importable as it’s a VERY long string)

Active Cooldowns: http://pastebin.com/uc4zQVyx

DPS cooldowns (Fallen Crusader, dmg procs, etc.): http://pastebin.com/sbffkiww

Notifications (Plague Leech, Defile, etc.): http://pastebin.com/6iHiKYAk

Soul Reaper: http://pastebin.com/AT2ENcMq

Bone Shield: http://pastebin.com/WBrcCcei

Runes (requires both): http://pastebin.com/410ePvEz – http://pastebin.com/2A5g2PXA

My HP and RP is actually Galvins Unit Bars. You can make an almost exact copy of this in weak auras, but for some reason weak auras gives a SLIGHT delay in hp tracking for me. This is unacceptable for DS timing, as that requires as fast reaction as possible, so adding a good chunk of a second in UI delay is NOT ok. This is the reason I do not have my HP/RP made in WA. The delay isn’t in any other ui component for whatever reason.

As a bonus, here is the evolution of my UI from the beginning to end of MoP.

(Be warned. I started out as a NOOOB)

The beginning

WoWScrnShot_093012_034208

The first appearance of my current rune weak auras (and the reason they are separated into 2 groups)

WoWScrnShot_093012_092919

Replaced Xperl as my HP/RP addon, and put runes together

WoWScrnShot_093012_230402

New cleaner frame for the runes/hp+rp

WoWScrnShot_100112_025308

Blood shield tracker moved above HP, and made the cooldown tracking symmetrical

WoWScrnShot_120512_160515

We who are about to raid, salute you.

As I log off for the night before normal/heroic Highmaul releases, I want to take moment to wish all raiders good luck, regardless of where you are in terms of “hardcore-ness”. Unless you are in competition with my guild, in which case I wish slightly less good luck.

The blog posts will continue of course, but you may notice a slight dip in the frequency due to the time spent raiding. My next post will happen in the next few days and will be a big interface/UI post where i’ll include my Weak Aura scripts for those who have been asking for them. On that note, feel free to request a blog post topic. Want to know more about something? Ask and maybe i’ll write a blog post on it!

Everything you need to know to play blood DK well is in my guides, but should any of you have any issues as we move into raid content you are ALWAYS welcome to shoot me a tweet, ask me a question here, or send me an in-game pst.

I’ll leave you with a picture of an empty wowprogress ranking, representing the start of a new tier and a new race to kill the bad guys.

BT1LaVKCIAA9pIP (1)

(I know this is from last tier and that 25 vs 10 doesn’t even exist anymore, but wowprogress hasn’t rolled over yet as of the time of this post so deal with it)


What to be thankful for in WoD

Hope all the american readers (and whoever else celebrated) had a good turkey day. In the spirit of thanksgiving (and also because I’m with my family and want to make this a short post) I’m going to enumerate some things we as blood DKs should be thankful for as we move into WoD raiding. I’ll make a nice big post to compensate for this short one after the holidays.


1. They haven’t nerfed Blood Boil (yet).

elmer-fudd

Currently Blood Boil is giving us amazing AoE potential, as well as good single target damage when we can spam BB. This may get nerfed, and if they do they NEED to compensate our single target damage, but for now Blood Boil and be merry.


2. We don’t have downtime issues

waiting

For those of you who followed Blood through the WoD alpha/beta, one of the biggest concerns throughout was our downtime, and it isn’t an issue at all thanks to changes made towards the end of the beta. Whether or not you are a fan of the new iteration of Blood DK, it could easily be a lot worse with tons of downtime.


3. Vengeance is gone

tombstone

No more having to worry about standing in fire to be optimal! This also makes tank damage balance much easier to tune. AP is one of the most important variables when looking at ability damage, and a wide range of AP coefficients mixed with a wide range of AP values (from 50k AP to 1m+ AP) made balance between tanks an absolute nightmare.


4. All our stats have both survival and damage value

Driftwood_Spiked_Shield

With the possible exception of Multistrike (more on that in a future blog post) all our stats have tangible offensive and defensive value. This is a huge improvement over MoP, where mastery and stamina were our best survival stats, but did absolutely nothing for damage.


Conclusion

Blood DK is in an ok spot right now. We are not top dog, but we are certainly not a runt.


Optimal t60 talents in WoD

Many people have read around the web and even my own guides that Blood Tap is currently the best thing in the world for blood dk. They’ve also heard for years about how Runic Empowerment is the bane of your existence and shouldn’t be touched with a 10 foot pole. In this post we’ll be looking at if those commonly conceptions are founded in fact (spoiler alert: they are).

Before we start, I’m going to introduce a common way of describing runes. It’s simply: BBFFUU. In this format, Xs are recharging runes. So if you used a Blood Boil and a Death Strike after having all your runes up, you would have BxFxUx, since you’d have 1 of each rune recharging. If you then used another Blood Boil followed by a Defile, you would have used another B and U runes, creating the rune state: xxFxxx. ezpz.

Runic Empowerment

So why is Runic Empowerment (RE) so terribad? It simply comes down to consistency being more valuable than overall throughput. For those of you who don’t hang around math nerds or engineers, throughput just means how much you are accomplishing over a given time. In this case, Runes. It’s a classic case of more is not always better.

limes

The very brief version for why RE is bad, is that it requires us to put all our runes down to get any benefit back. Runic Corruption and Blood Tap both let us hang on to our current runes while we work towards the benefit of new runes. This is because RE only works on fully depleted runes. Using the rune display format I showed in the intro, a fully depleted rune is a rune with both x’s, in other words both are recharging. In the state: BxFxUx, no runes are fully depleted, even though there is a rune recharging of each kind. However the state xxFxUx has its blood runes fully depleted, since both are recharging (thy are both x).

RE requiring fully depleted runes back means that if you want to spend RP (which we do very very often)  and want that RP to go to something like Death Strike (which we do very very often), you need to make your F and U runes fully depleted while leaving your B runes not fully depleted so that it’s guaranteed to hit an F or U rune, whichever you happen to need. That means getting into a rune state of xBxxxx. That way your first proc of RE will get you either xBxFxx or xBxxxU, and the following proc guaranteed to get xBxFxU. So what’s wrong with that? Notice how the first 2 states are completely useless in respect to Death Strike, which needs an F and a U rune to be used. Also keep in mind that RE is a % to proc, meaning you have a chance to be left with either of those first 2 useless states where you can’t Death Strike if you need to, which is a dangerous position to be in. Let’s take a look at the chances of being left in these positions after fully depleting your runes.

The RNG behind RE

lucky

So lets look at the chances of getting a DS back after putting all your FU runes down to make them fully depleted. Remember this has to happen every time you want to dump RP.

At 0 seconds you put your runes down and are now in a xBxxxx state.

1 second later you will have done 1 Death Coil, meaning a 45% at a depleted rune coming back. This means that since second 0 you have a 0% chance of having a DS and a 100% chance of not having a DS at this moment (1 second).

At 2 seconds you will have done 2 Death Coils. You will only have Death Strike available if you land both procs, so you have a .45\times.45=20.25% chance of having a Death Strike available 2 seconds and 60 RP since you depleted your runes.

At 3 seconds (I promise this is the last one I’ll do) you will have done 3 Death Coils. You only need 2 of the total 3 procs to get your DS back. This means the chance of us having a DS is the same as the (chance to get exactly 2 out of 3 procs) + (the chance to get exactly 3 procs), which is (.45^2\times.55\times3)+(.45^3)=42.525%

After 3 seconds, you are still more likely to be left without a Death Strike. This is not good for Death Strike timing.

“But Reniat, you stopped at 3. At 4 seconds you have an almost 61% chance to have a Death Strike back!” – you

After 3 seconds you will very likely need to use your blood rune to have enough RP for a 4th Death Coil, which means the 4th Death Coil will likely happen at 5 seconds. This is simply way to long to be potentially left without a FU pair.

Conclusion for Runic Empowerment

So we’ve determined that you will spend around 3-5+ seconds after you put your runes down to get your Death Strike back, which is 3-5+ seconds where you simply cannot react to damage with a Death Strike. That’s not good, regardless of how much more rune throughput you have compared to the other two talent options. remember you have to take this gamble every single time you want to dump runic power, which happens a LOT. Keep in mind the other 2 options have no such mandatory downtime. This alone completely nullifies Runic Empowerment as a good option for Blood tanking whenever Death Strike timing is an an important factor.

Blood Tap

Blood Tap is listed in nearly every guide on the internet for blood as being the best talent. Why is that? While the ability to control exactly when you get your runes back is very good, the real reason behind blood tap’s strength is the fact that it always returns Death runes. Being able to turn Blood runes into Death Strikes is very powerful in regards to mitigation, and being able to turn F and U runes into D runes when they would otherwise come back as F or U is a huge dps benefit in AoE situations due to Blood Boil. Essentially Blood Tap makes all your runes into very flexible resources, as opposed to the normal segregation of B runes for Blood Boil/Soul Reaper and F and U runes for Death Strike.

bob-ross

One of the benefits of this Death rune flexibility is when we use a U rune on Defile, potentially leaving us with something like a xBxFxx rune state, where we have an unusable F rune. Being able to use 5 charges to get a guaranteed D rune means that the orphaned F rune is easily turned into an F D pair for use as Death Strike. Another benefit to this flexibility is being able to always get a D rune for Rune Tap or Soul Reaper as long you have at least 5 charges of BT.

On top of the flexibility is the ability to conserve charges for large hit mechanics. You can save 10 charges and both FU pairs, use both FU pairs then use 10 charges for a third to get 3 Death Strikes in 3 seconds to put in front of a huge hit. No other talent option can do this.

Runic Corruption

“Consistency is contrary to nature, contrary to life.

The only completely consistent people are dead.”

-Aldous Huxley

 Well since I’ve yet to see a Death Knight that didn’t start out by being raised from the dead in Acherus by the Lich King at lvl 55,  I can safely assume none of us are living. That means according to our friend Huxley, consistency is good for us! Consistency is one Runic Corruptions greatest assets. It doesn’t have the aoe damage potential of Blood Tap, nor the Death Strike flexibility of Blood Tap, but it has beautifully consistent and fluid rune return.

Energizer_Bunny

Consistency is one of the most important aspects of tanking in general. For example, it’s better to take slightly more damage overall if you always take it a little bit at a time instead of taking very little normally but occasionally taking huge amounts of damage. This is one reason why Blood DK has always been concerned with removing burst damage and mitigating spikes, because those are our biggest threats. It’s the basis behind a LOT of our playstyle, like the idea of spreading out cooldowns as opposed to stacking them. Or holding on to Death Strikes to make sure we can recover from bursts immediately. Long story short: Consistency = very good.

“So if consistency is so great, why is Runic Corruption not the go to talent?” -you

Because fluid rune return doesn’t always translate to consistent damage intake. Due to the nature of it being optimal to sit on FU pairs for recovery Death Strikes, rune return isn’t always an immediate benefit to our damage intake pattern. More runes is never a bad thing, and if you are able to get FU pairs back faster consistently, you are able to lower your standard for “burst” and make yourself even smoother, however Blood Tap does this even better due to the RNG-less return as well as the increased DS/min (which is rarely a good metric for measuring effectiveness btw. please don’t take this out of context.) in comparison to Runic Corruption. That’s before you even take into account the complete superiority of Blood Tap in regards to damage output in AoE situations thanks to more Blood Boil spam potential, and even the quality of life benefits of being able to free orphaned runes and always have a rune for Soul Reaper/Rune Tap.

There are some situations where RC is better, however only one is common. That situation being when you are not able to use your Blood Tap charges effectively due to not being comfortable with the mechanics. Blood Tap is only better if you can actually use the charges. If you are wasting charges by using Death Coil at 12 charges, or using your charges but having rune recharge being wasted by having both of one kind of rune up a lot, then you are going to get more value out of the much smoother and easier to use Runic Corruption.

“So you’re saying I should use RC if I suck” -you

Not exactly. I’m saying you should use RC if you are still familiarizing yourself to the basics of Blood DK gameplay. It’s better to use RC until you are comfortable enough with everything else that you can learn to use Blood Tap well. There is a lot to learn for incoming Blood DK. It’s probably the tank that requires the most flight hours to play well, since so much of good Death Strike timing is simply practice and experience.  There is 0 shame in spreading out the things you have to learn. If you feel you that using RC makes it easier for you to work on the other more important factors of DK tanking (aggro, cooldowns, boss movement, fight mechanics) then I would highly encourage you to do so.

Conclusion

Blood Tap is the best, Runic Empowerment needs to be taken out back and put down, and Runic Corruption is good for learning purposes.

1340862857527_Olympic Podium

Q.E.D.

Modeling lvl 100 talents (with math!)

WARNING

The information found here regarding Breath of Sindragosa and Defile is outdated. Please refer to the newer post regarding that information.

Modeling level 100 talent damage

With the new expansion comes new shinies. In this the first “real” post of this blog, let’s dive in and take a deep look at each option. While you COULD just use simcraft to find the damage output differences, I prefer to do my theorycrafting on paper. Plus who doesn’t love math? It is important to remember however that doing this gives us a THEORETICAL model of these talents. You have to adjust the conditions around these models to get any practical information.

The first step to comparing damage without simulating it, is to model each of the talents mathematically.  This means making a formulaic representation of the abilities damage. For example: if you wanted to mathematically model the damage per second of a dot that ticked once every 3 seconds for 50% AP each tick, it would look something like this: DPS = (damage)*(ticks per second), which is basically saying “how often and for how much”. Plugging in our given values (50% AP every 3 seconds) and we get DPS = (.5*AP)*(1/3) = 1/6*AP, or 16.67% AP per second. If you had 7,000 attack power, this dot would have a base DPS (so not including anything like +% dmg modifiers or other boss mechanics) of 1166.67 DPS.

One of the reasons I prefer to do my theorycrafting this way as opposed to using simcraft, is because it’s very easy to come back and adjust for various nerfs/buffs. Let’s say they buffed this buffs tick rate to once every 2 seconds. All we’d have to do is adjust the formula: DPS = (.5*AP)*(1/2) = 1/4*AP or 25% AP per second,  at 7,000 AP this becomes 1750 dps. Quite a buff! nerfbat incoming…

Now that we’ve established what a formulaic model LOOKS like, we need to go about making one that works for the lvl 100 talent options. In the example above we only looked at single target damage. For a real comparison we’re going to have to account for the number of enemies (and a bunch of other talent specific stuff), which means our final comparison will be in terms of both AP and the number of mobs we are attacking, and stuff like how often you use Blood Boil, and all sorts of goodies.

With the intro out of the way, let’s start modeling!

Breath of Sindragosa

Breath of Sindragosa is by far the easiest to figure out conceptually speaking. The damage formula for it is as follows: AP on the primary target, and AP/n for all secondary targets where n is the total number of targets, primary included. For example, if you had 3000 AP (and no versatility or other +dmg% modifiers) and used BoS to hit 5 targets, the first target would take 3000 damage. The other 4 targets would take 1/5*3000 = 600 damage each. This means that the total damage of a tick of Breath of Sindragosa is equal to AP+(AP/n)*(n-1).

The only other factor we need to fully model BoS is how long we can keep the buff up on average. This means knowing how fast we generate RP on average, and treating how much RP we have when we first use it as a variable. I will make a blog post regarding this and other numbers like it soon, but for now just trust me that our RP gen per minute is:

sumgenad

einsteinshow (1)

To find the total time you can cast BoS, need to find out how long we can maintain RP. Do to this we can simply use a simple physics equation: v1= v2 + a*t (hence Einstein). Our v1 is our ending RP (in this case , 0 because we’ll have run out). Our starting RP is whatever we had when we started using BoS. a is how fast we are gaining and/or losing RP. BoS costs 15 RP per tick, and it ticks every second. This gives us a rune expenditure of 15 RP per second. Using the RP gen per second  we can find the net gain/loss of RP per second to represent a:

a

plug it all in and solve for t and you get:

t

(note that even though it looks like t will be negative here, a will also be negative so t will end up positive.)

With t found, we can model the whole of BoS’s damage as damage per tick*the number of ticks per use of BoS. Since it ticks once every second, number of ticks is t+1, because you get a tick at 0 seconds when you first use that ability. This means if BoS lasts for 3 total seconds, you would get ticks at t = 0,1,2, and 3. However you also have to subtract 15 RP from inital RP, as it takes 15 RP to initiate BoS. After all is said and done, they cancel eachother out. You don’t get a tick at 0 seconds, but you don’t spend the 15 rp either, leading to an extra tick on the end. This means t = number of ticks. Now we finally find BoS dmg per second to be:

DPS = (damage per tick * ticks/second)

realbospreminus

Finally we will need to account for the RP spent in terms of potential Death Coils. BoS damage isn’t free. Every tick of BoS is worth 15 RP, which is half a Death Coil. This means that per tick, we subtract half a Death Coil (which is .85*AP/2 = .425*AP) from every tick.

And at last we have a full model for the damage gains of BoS:

realbosfinal

Necrotic Plague

You cannot refresh NP, and doing anything that would apply NP simply adds a stack. This means that how fast you get to 15 stacks (the cap) is dependent on how fast you are using Blood Boil. So how do we find BB/sec? Well like the average RP generation from the BoS segment, that takes a TON of math and I don’t want to clutter this post with it just yet. There WILL be a blog post down the road showing how the numbers are achieved, but for the purposes of this comparison suffice it to say that the BB/sec for MAX BB use (every B AND D rune) is:

bbsec

(we’ll call this $BB)

(note: The number of enemies attacking you comes from the RP gained from NP, where you get 2 RP whenever a mob swings at you. We are assuming a 1.5 second swing timer.)

From here, calculating the time until 15 stacks is just like figuring out how long it will take a car to reach 60 miles an hour. The base “acceleration” of NP is one tick (which grows it 1 stack) per 2 seconds. In other words, 0.5 stacks per second. We simply add the stacks/sec acceleration given by the BB/sec model we have above, and we get an acceleration of 0.5+$BB per second.

Now that we have a way to model the growth of NP as a function of haste and multistrike, we can start to piece together the total damage.

First let’s break the growth into 2 parts: the rise to 15 stacks and the total time in 15 stacks. These together will add up to 30 seconds (NPs total duration) so we can put it in an equation like this: (growth time +  max stack time) = 30. We can find the growth time by an old-fashioned physics equation. v2=v1+a*t, where v2 is our desired velocity (or in our case stack count) v1 is starting velocity (in our case, 1 stacks) and a is our growth (0.5+$BB) and t is what we want to solve for. t = 14/(.5+$BB).  This means we can find the time that NP is at max stacks by taking 30 – 14/(.5+$BB). Let’s solve the easy part first, the max stack damage. All we need to do is find the number of ticks we get at 15 stacks. We already know the average time in seconds NP will be at 15 stacks (30-14/(.5+$BB)), and we know NP ticks every 2 seconds. Therefore the total tick count at 15 stacks is equal to 15-14/(2*(.5+$BB)).

Now we’ve spent quite a lot of time looking at variables. Sometimes it’s nice to come up for air and check to make sure our numbers are realistic. Given my current stats (518 haste and 21.56% multistrike raid buffed) we can figure out using our math above that my theoretical max BB/second is 0.34895, in other words I’m blood boiling an average of once every ~3 seconds. It’s important to remember that this is an average. You will have much high BB/sec if you pop ERW after expending all your runes on BB for a total of 8 BB each 1 GCD apart, but you would also then have a very large downtime of no BB due to no runes. With my average BB/sec, it would take me about 17.67 seconds to reach 15 stacks if I were spamming BB. This is about what we’d expect given that if you used no Blood Boils at all it would take you the full 30 seconds to reach 15 stacks on the final tick.

Recap so far

If this isn’t an accurate impression of you at this point, then it will be. It will be…

A1-Math-003

Alright let’s take some inventory. We have figured out the theoretical maximum Blood Boils per second as a function of haste and multistrike. Then using that, we found the model for how many ticks we have at full strength (15 stacks) and how many we have leading up to full strength.

Now let’s go further and apply the number of ticks * damage of each tick to get an actual damage result. The 15 stack damage is easy to calculate, since the stack doesn’t change. The formula for NP is (1+0.025AP)*stacks, so the total damage of that part of NP is equal to damage*numbers of ticks = (15+.375*AP)*(15-14/(2*(.5+$BB))). All that’s left is to find the damage of the growth portion of NP. This takes a bit more modeling (sick of it yet?)

We know how many ticks it will take to reach 15 stacks (14/(.5+$BB))/2), We know how fast the stacks grow, and we know how much damage NP will do at a given stack value. The way we are going to model this looks like this: tick1+tick2+tick3+….tickn, where n is the number of ticks that occur at <15 stacks.  So for example let’s say that you managed to use Blood Boil every 2 seconds (to make the math cleaner). Tick1 would be at 1 stack, tick2 at 3 stacks, tick3 at 5 stacks…..tick 8 finally hits 15 stacks, so n was 7 because the 8th stack was at full strength.

If you’ve taken any math at a pre-calculus level or above (and remembers it) you should be familiar with the ∑ symbol. It represents a summation operation.  So the sum from i=1 to 5 of the function i would be: 1+2+3+4+5. We are going to use a summation to model the ticks <15 stacks, but what do we sum from? And how far do we go? Well we’d like to sum from 1 (1 stack) to our tick count (14/(.5+$BB))/2), however there is a slight problem. Indexing only uses integers. In other words, it doesn’t make sense to count: first, second, third, third and a half-th(?). When you enumerate items, you can’t have a partial item. The number of ticks we have is a theoretical average, and is not an integer, meaning we have to account for the left over bit somewhere else. In other words, if we would get 8.5 ticks as a theoretical average, then we would sum over 8 ticks and add one more tick worth half of what a normal 9th tick would be. We can do this with the floor function “⌊⌋” in our summation, which will round our tick count down for summation.

But what will the function look like that we sum over? How do we know the current stack count? Well we know that each tick is 2 seconds apart, so we can use the stack growth rate to see the average stack count for that tick based on the time since the very first tick. For example tick 8 would happen at 16 seconds, and with a growth of (.5+$BB) it would have a stack of 16*(0.5+$BB)+1 (the +1 is because NP starts at 1 stack, not 0). With all that in place the model for the <15 stack portion, and including the portion for the full strength ticks, we get a full model of NP’s tick damage that looks like this:

nptickdmg

That is a bit messy, however it is a complete model of the ticking damage for NP. We don’t need this again until we put it all together.

There’s one final piece that needs to be considered when looking at NP’s damage, and that is the RP gained when mobs swing at you. Observant readers will notice I added a little note when I showed the BB/sec formula, which means all the work up till now has been including the RP gains from NP. Phew… But we still need to acknowledge the damage of actually spending the RP, not just how that RP affects BB/sec.

You get 5 RP whenever you are swung at, and we can assume that a standard mob will swing at you once every 1.5 seconds. This means that for each target you get 10/3 RP per second, or (10/3)*n where n is the number of targets. Death Coil costs 30 RP, so that means you get ((10/3)*n)/30 DC per minute. That’s not the end though, because those Death Coils gave us Blood Tap stacks, which can be used for more runes, which gives us more RP which gives us….

It may sounds like an infinite loop, but I promise it’s not. It diminishes significantly each time. It can be modeled by what’s called a geometric series. The value gets smaller and smaller so quickly, there is a point at which it will never give more than a certain amount of RP. To help visualize this, let’s use the old half-step thought problem. If you were to stand 2 meters away from an object, then half the distance between you and the object every second, how many seconds would it take to reach the object? After the first second you would be 1 meter away, then .5 meters away, then .25 meters, then .125 meters, then .0625 meters… This would go on until the end of time, and you would never reach the object until you reached infinity.

“But there is a set distance between the 2 objects! How can you move forward forever? The total distance covered can NOT exceed 1 meter!! And what the hell does this have to do with Necrotic Plague!?!?” -you

To answer the first point, yes. Let’s take a look at it in the form of a geometric sum. Notice how in the graph below, the curve gets more and more horizontal as you get higher and higher, never quite reaching 2 but always getting closer.

WolframAlpha--Sum12k_k_0_Infinity--2014-11-22_0123

You can see that as you get closer and closer to infinity, you get closer and closer to 2. This is called a convergent series, and it means that if you added up ALL points to infinity in that series, you would get a non-infinite value – in this case 2.

To answer your second question, we are going to use the same principle to figure out the total gain from an infinite series of turning runes into RP, then turning the RP into Death Coils, then turning those into runes, which turns back into RP, so on so forth. When you spend 30 RP on DC, you get 2 charges of BT. This translates to 40% of a rune. Let’s assume for the sake of comparing damage output that you will use that rune on a Blood Boil. So our first “step” has us getting 1 DC and 40% of a BB. When we spend that BB though, we get 10 RP back, so the next chunk has us getting 40% of 10 RP back to spend on 2/15ths of a Death Coil, so on so forth. Let’s look at it on paper.

30 RP = 1 DC + 2/5BB + 4 RP

4 RP = 2/15 DC + 4/75BB + 8/15 RP.

8/15 RP = 4/225 + 8/1125BB + 16/225 RP

so on so forth

Can you see the pattern? Rewritten, this is 1 DC + .4*BB + 2/15*(1 DC + .4*BB) + 4/225*(1 DC + .4*BB)+…..

If we rewrite it again with (1 DC +.4*BB) replaced with x we get x+2/15*x+4/225*x+……

We have a geometric series! YAAAY!!!

gif_write_8afd83

Just like the distance problem (which is called “Zora’s paradox” btw) from earlier, we can find the value that a certain amount of RP gives us including ALL the infinite returns of RP and runes by finding the sum we just wrote. Turns out it ends up being a very clean (15/13)*x where x is the amount of rp. If you like this kind of math, then you’ll love the blog post that covers how we found the BB/sec formula.

So in summation (no pun intended) we have the mathematical model of NP for damage and as a function of haste, multistrike, and the number of targets and it is:

realnppredots

Now that we have the total damage, we need to subtract the damage we lose by not having our normal dots. We can’t have both at the same time, so we need to account for their damage when looking at NP.

realnppostdots

Where n is the number of targets and $BB is the BB/sec, given by the equation:

bbsec

Now we just account for this happening once every 30 seconds, and we get the DPS.

realnpfinal

Defile

Defile is by far the easiest of the three options to model. There are only a couple of situation factors to think about here: How long the target stays in Defile and how many targets it is hitting. Defile increases its tick damage by 2.5% every tick. So if it’s damage is x, then the 2nd tick will tick for 1.025x, and the tick after that ticking for 1.025(1.025*x). This should seem very familiar to what we just did with Necrotic Plague. It’s a geometric series! YAAAAY!!!!1

gif_write_1aea6e

This geometric series looks like x + 1.025x + 1.0252*x + 1.0253*x. We already know how to solve geometric series. The only difference is i will go from 0 to 9, representing the 10 ticks of Defile as opposed to from 0 to infinity. This means the total damage for Defile per cast is ∑09(x*1.025i), and on a 30 second timer we can cast it twice a minute, giving us a dps of (1/30)*∑09(x*1.025i) which simplifies to 0.373446*x. Now we just substitute x in for the tick formula for Defile, which is 1+.275*AP and multiply times the number of enemies in the radius of Defile and you get the final DPS of Defile: n*(1/30)*∑09((1+.275*AP)*1.025i) where n is the number of enemies in Defile.

Before we’re done however, we have to subtract DnD damage. At the time of this writing, DnD is almost identical in damage to Blood Boil. In fact, the only time DnD does more damage than Blood Boil is if EVERY tick hits the boss. If the boss moves off dnd for even 1 tick you would have done more damage with BB, but for the sake of this model DnD is still the correct ability to subtract for the rune as we are looking at things in a vacuum where we can always assume every tick hits.

defilefinal

 Putting it all together

OOOOKAY. after a TON of math, we now have some math models for each talent choice dependent only on base stats such as AP, haste, and multistrike.

As a recap, here are the models.

Breath of Sindragosa

realbosfinal

where n is the number of targets hit by the cone.

Necrotic Plague

realnpfinal

Where n is the number of targets and $BB is the average BB/sec, given by the equation:

bbsec

Defile

defilefinal

where n is the number of targets in Defile’s radius.

Comparing the models

In order to compare the models we made, we need to set up some situations. The possible situations are innumerable, and can be as specific as you need for your situation, but there are some default situations that are commonly considered when looking at dps. Those are things like large aoe packs, small aoe packs (like 3-4 mobs), sustained vs burst damage, high stats vs low stats, etc. I will point out that we are currently unable to model sustained vs burst, as all our calculations involved full duration. In other words, we are locked into a sustained situation because I have been writing this blog post for 3 days, and am frankly tired of modeling Necrotic Plague. Just know that it’s completely possible using the same techniques displayed in this post.

Bach-deal-with-it

Let’s make 2 simple comparisons: Current gear with high AoE and current gear with 1 target.

In order to apply these comparisons, we just set up values for the variables in play. Let’s use my gear (which is currently only 632. The loot gods have not been kind). As of this post I have 518 haste, 533 multistrike with food, and 5122 AP when flasked. Specifically, let’s find out how many adds it takes for Breath of Sindragosa to do more damage than Defile.

The model is going to look like Breath of Sindragosa DPS > Defile DPS, and treating n in both equations as a free variable. If a value for n greater than 0 exists that satisfies that inequality, then that add count n is the number at which NP will be more sustained DPS versus Defile.

Lets assume you enter BoS with fairly high rp (let’s say 75). Plug in all our values and we find:

BoS DPS = ((5122+(5122/n)*(n-1)-.425*5122)(-(75)/((((13/11)*(60 + 207.9(518/10000+1) + 577.5(518/10000+1)*(.15+533/6600)))/60)-15)))/120 = 746.933-474.243/n

Next calculate Defile’s damage as a function of add count:

Defile DPS = n*(1/30)*(∑09((1+.275*5122)*1.025i)-(1+.12*5211)*10)= 317.618 n

then we plot them and compare!

real1

Notice how the blue curve (Breath of Sindragosa) never surpasses the red line (Defile). This means that with our given stats, Defile will always do more damage, assuming all hits tick. This is what we would expect, since Defile doesn’t have diminishing returns on AoE and BoS has a steep DR, giving it the curved shape.

But what if…

Defile is ONLY based on AP, while BoS is also based on haste and multistrike. How much haste would you need for BoS to surpass Defile on 1 targets? Again assuming you build to 90 RP before using BoS.

We will set up the curves as before, but this time leave haste as an independent variable. Just like before we are looking at the curves and how they interact.

real2

Notice how they intersect at around 2000. This means that after than intersection point (which is actually 1938.92 haste rating) then BoS will do more damage single target than Defile. HOWEVER. It is INCREDIBLY important that we keep in mind that this includes our AP sitting at 5122 and not moving an inch. THIS DOES NOT MEAN THAT YOU SHOULD USE BoS. You should still use Defile any time you are not going to be moving the boss often, even if you had an on use haste trinket to reach this value because this is assuming you also get plenty of RP going into BoS which isn’t always reliable. You will also lose damage from using an on use haste trinket compared to a better itemized trinket as haste is not nearly as good for us as strength, bonus armor, crit, or versatility. 

Conclusion

While Defile is still going to be the talent of choice 90% of the time until they balance the tier, it is still worth knowing how to mathematically model these talents should they become balanced. It’s also a fun way to kick off a blood DK blog!

Q.E.D.